
How to Authenticate Server-Sent Events in ASP.NET Core
After a talk I gave about the difference between SSE and SignalR, and how to implement user-targeted messages in both of the tools, I was asked a very important question that I hadn’t covered during the session. “Can an SSE be authenticated? (does it have Authorization headers)”. Since SSE is simply a way to stream events to the clients, via a normal HTTP request, the short answer is yes. The longer answer depends on what client/API you use. In this article, I explain the different ways to use SSE with authenticated users, what the pitfalls are, and how to avoid them.
EventSource
In the example that I shared during the session, I was using EventSource to connect to my SSE endpoint. But here’s the issue: EventSource doesn’t support sending headers. So what are the alternatives? How can we authenticate our client using EventSource?
Cookies
The good thing is that EventSource automatically sends cookies when connecting to an SSE endpoint, provided the browser’s cookie and security rules allow them.
Same-Origin
If your client application and API are on the same origin, and the browser already has an authentication cookie, then it will automatically include it in the SSE request.
On the server side, your ASP.NET Core endpoint can then use the normal authentication middleware. The important part is that SSE doesn’t bypass the authentication middleware. As long as you have configured the endpoint to have an authorized client, for example .RequireAuthorization in minimal API, that should be enough.
Cross-Origin
If your client application and API are not on the same origin, such as:
- Front-End: https://app.example.com
- Back-End: https://api.example.com
Then you need to explicitly tell EventSource to include credentials.
This can be done using withCredentials: true:
const events = new EventSource("https://api.example.com/api/events", {
  withCredentials: true,
});
And of course, the cookie must be valid for the API domain.
In this case, you also need to allow credentials on your server’s CORS configuration:
builder.Services.AddCors(options =>
{
    options.AddPolicy("frontend", policy =>
    {
        policy
            .WithOrigins("https://app.example.com")
            .AllowCredentials()
            .AllowAnyHeader()
            .AllowAnyMethod();
    });
});
Important note here: Do NOT use AllowAnyOrigin together with AllowCredentials().
Short-Lived Tokens
Scenario
Before I explain what short-lived tokens are and why to use them, let me describe the demo we’ll use.
We will have a newly created Aspire app with two projects and one integration:
- Backend project
- Frontend project
- Keycloak component
Implementation
What if I am not using cookies? What can I do?
In this case, we can fall back to short-lived tokens. A short-lived token is a token that you can request from the server that is valid only for a very short time. Why does this help? Even though EventSource doesn’t support headers, we can still pass query parameters.
Passing our access token in the URL is not safe. It might get logged somewhere and leak through server or proxy logs. We don’t want that to happen.
We’ll implement an endpoint that an authenticated user can call to request a short-lived token. Then we’ll pass that short-lived token (SLT) as a query parameter to our SSE endpoint. Even if it is logged, this token won’t be active after a very short amount of time, and it’s a single-use only, which is the most important part.
First, let’s start by implementing an in-memory store for the tokens:
public class ShortLivedTokenStore
{
    private readonly ConcurrentDictionary<string, string> _tokenStore = [];
    private readonly TimeSpan _lifeTime = TimeSpan.FromSeconds(10);

    public string GetToken(string userId)
    {
        var token = Guid.NewGuid().ToString();
        _tokenStore.TryAdd(token, userId);

        _ = Task.Run(async () =>
        {
            await Task.Delay(_lifeTime);
            _tokenStore.TryRemove(token, out _);
        });

        return token;
    }

    public bool TryConsume(string token, [NotNullWhen(true)] out string? userId) => _tokenStore.TryRemove(token, out userId);
}
ShortLivedTokenStore should be added to the services as a singleton.
The purpose of this class is to have an in-memory store for the short lived tokens. It will save them in a dictionary with their user ID. We don’t use the ID in this demo, but storing it shows how a token maps to a user.
Once we create a token, then we add it to the dictionary, and run a task that will expire the token after 10 seconds in this scenario.
Finally, the TryConsume is used to check if we have the token in store, and expire it - while outputting the userId for use (which we’ll skip in this demo).
Important note: Guid.NewGuid() works, but isn’t advised for security tokens. Don’t use that in production. Instead you can use RandomNumberGenerator.GetBytes(32) encoded as Base64Url.
For production use, it’s better not to use an in-memory store for the SLTs. This doesn’t scale across multiple instances, and tokens are lost on restart. You can use Redis/IDistributedCache instead.
Then we’ll use an endpoint so authenticated users can request a short lived token:
app.MapGet("/request-slt", (HttpContext context, ShortLivedTokenStore store) =>
    {
        string? userId = context.User.FindFirst(ClaimTypes.NameIdentifier)?.Value;

        if (string.IsNullOrWhiteSpace(userId))
        {
            return Results.Unauthorized();
        }

        return Results.Ok(store.GetToken(userId));
    })
    .WithName("RequestShortLivedToken")
    .RequireAuthorization();
This endpoint requires an authenticated user, so not just anyone can request a short lived token. It will call our injected token store and request one.
Then we’ll expose an endpoint that accepts an slt for authentication and stream events:
app.MapGet("/events-slt", (string shortLivedToken, ShortLivedTokenStore store, CancellationToken cancellationToken) =>
{
    if (!store.TryConsume(shortLivedToken, out _))
    {
        return Results.Unauthorized();
    }

    int count = 0;

    async IAsyncEnumerable<int> StreamEvents([EnumeratorCancellation] CancellationToken ct)
    {
        while (!ct.IsCancellationRequested)
        {
            yield return count++;

            try
            {
                await Task.Delay(1000, ct);
            }
            catch (OperationCanceledException) when (ct.IsCancellationRequested)
            {
                yield break;
            }
        }
    }

    return Results.ServerSentEvents(StreamEvents(cancellationToken));
}).WithName("GetEventsWithShortLivedToken");
This endpoint accepts a short lived token as a query parameter and validates it in the store. If it can’t be found, it will return an unauthorized result, otherwise it will start streaming events back to the client.
Important note: EventSource auto reconnects to the same URL after a network drop. In this case, a reconnect will get a 401 error and closes permanently. The client needs to request a new SLT and create a new EventSource.
The JS file that the client uses in this case is:
const connections = {};

export function connect(
  id,
  url,
  dotNetObject,
  messageCallback,
  errorCallback,
  shortLivedToken,
) {
  disconnect(id);

  const source = new EventSource(
    `${url}?shortLivedToken=${encodeURIComponent(shortLivedToken)}`,
  );

  source.onmessage = (event) => {
    dotNetObject.invokeMethodAsync(messageCallback, id, event.data);
  };

  source.onerror = () => {
    dotNetObject.invokeMethodAsync(
      errorCallback,
      id,
      `Connection failed or was closed for ${url}.`,
    );
    disconnect(id);
  };

  connections[id] = source;
}

export function disconnect(id) {
  const source = connections[id];
  if (!source) {
    return;
  }

  source.close();
  delete connections[id];
}
Using @microsoft/fetch-event-source
If you don’t want to implement an extra layer to request short lived tokens, you can use the library @microsoft/fetch-event-source which uses the fetch() API to handle SSE. Using this library lets you send authentication headers.
In a Blazor application, we can implement it using JavaScript:
import { fetchEventSource } from "https://cdn.jsdelivr.net/npm/@microsoft/fetch-event-source@2.0.1/+esm";

const connections = {};

export async function connect(
  id,
  url,
  dotNetObject,
  messageCallback,
  errorCallback,
  token,
) {
  disconnect(id);

  const controller = new AbortController();
  connections[id] = controller;

  try {
    await fetchEventSource(url, {
      headers: {
        Authorization: `Bearer ${token}`,
      },
      signal: controller.signal,
      onmessage(event) {
        dotNetObject.invokeMethodAsync(messageCallback, id, event.data);
      },
      onerror() {
        dotNetObject.invokeMethodAsync(
          errorCallback,
          id,
          `Connection failed or was closed for ${url}.`,
        );
        controller.abort();
      },
    });
  } finally {
    if (connections[id] === controller) {
      delete connections[id];
    }
  }
}

export function disconnect(id) {
  const controller = connections[id];
  if (!controller) {
    return;
  }

  controller.abort();
  delete connections[id];
}
We can then invoke this JS function from our Blazor application and it will accept an authorization header.
HttpClient
Finally, in the .NET ecosystem, we can use HttpClient to call an SSE endpoint passing the authorization headers with it.
A very simple implementation might look like this:
public static class SimpleSse
{
    public static async IAsyncEnumerable<string> StreamAsync(
        HttpClient httpClient,
        string endpoint,
        string? bearerToken = null,
        [System.Runtime.CompilerServices.EnumeratorCancellation] CancellationToken cancellationToken = default)
    {
        using var request = new HttpRequestMessage(HttpMethod.Get, endpoint);
        request.Headers.TryAddWithoutValidation("Accept", "text/event-stream");

        if (!string.IsNullOrWhiteSpace(bearerToken))
            request.Headers.Authorization = new System.Net.Http.Headers.AuthenticationHeaderValue("Bearer", bearerToken);

        using var response = await httpClient.SendAsync(
            request, HttpCompletionOption.ResponseHeadersRead, cancellationToken);
        response.EnsureSuccessStatusCode();

        await using var stream = await response.Content.ReadAsStreamAsync(cancellationToken);
        using var reader = new StreamReader(stream);

        while (await reader.ReadLineAsync(cancellationToken) is { } line)
            if (line.StartsWith("data:", StringComparison.Ordinal))
                yield return line.Length > 5 && line[5] == ' ' ? line[6..] : line[5..];
    }
}
This will return the data as a string for the caller to deserialize it.
For a full implementation, have a look at my dotnet-sse-client library which you can install using:
dotnet add package DotNetSseClient
To test each way that SSE can be authenticated, you can get the source code from the demo GitHub repository, launch the Aspire App, and go through the different menus of the web app to see how each approach works. It has five pages, one for each approach explained in this article.
Note that this demo code uses the DotNetSseClient library shared above.
Which authentication approach should you use?
Every approach below works. The right one depends on your client, and on whether you already have cookies or bearer tokens.
Comparison
| Approach | Client | Custom headers? | Server changes | Reconnect behavior | Main catch |
|---|---|---|---|---|---|
| Cookies (same-origin) | EventSource |
Not needed | None beyond normal authentication | Native auto-reconnect works | Requires cookie-based authentication |
| Cookies (cross-origin) | EventSource with withCredentials: true |
Not needed | CORS with AllowCredentials() and explicit origins |
Native auto-reconnect works | SameSite rules and third-party cookie blocking |
| Short-lived token (SLT) | EventSource |
No (token goes in the query string) | Token endpoint, token store, and validation on the SSE endpoint | Breaks with single-use tokens: the client must request a new SLT and create a new EventSource |
Tokens can end up in URLs and logs, so keep them short-lived and single-use |
| fetch-event-source | JavaScript library (@microsoft/fetch-event-source) |
Yes | CORS must allow the Authorization header |
You control it through onerror, but retries reuse the original token |
Retries forever unless onerror throws; closes when the tab is hidden by default |
| HttpClient | .NET code | Yes | None | You write your own retry logic | Parsing is basic unless you use a library |
Which one should I use?
-
Is your client .NET code (MAUI, desktop, console app, another service)? Use
HttpClient, ideally withSystem.Net.ServerSentEventsor theDotNetSseClientlibrary on top. -
Is your client a browser, and do you already use cookie authentication (or a BFF)? Use cookies. Same-origin is the simplest option. Cross-origin works too, as long as CORS is configured correctly.
-
Is your client a browser using bearer tokens (Keycloak, JWT) and no cookies?
- Can you add a library? Use fetch-event-source. It needs no extra server endpoints and keeps tokens out of URLs.
- Must you use the native
EventSource? Use short-lived tokens.
Default recommendation
- Use cookies if you have them.
- Use fetch-event-source for bearer tokens in the browser.
- Use short-lived tokens only when you must use the native
EventSource. - Use
HttpClientfor anything that isn’t a browser.
Quick visual reference
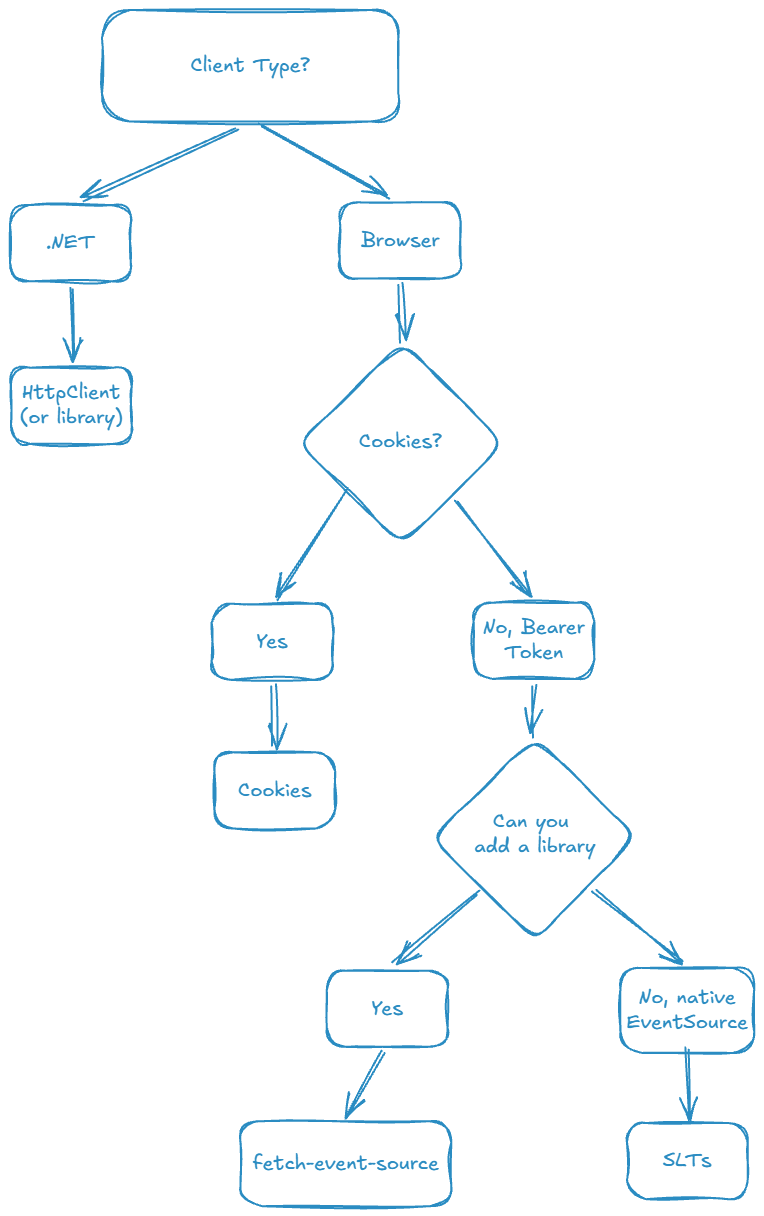
Is it a rule?
It’s not a rule to take a decision this way, after all, you should use what matches your technology stack and business domain. For example, you can use Blazor with all these 5 different approaches, so the final decision is what you can/can’t use.
Final thoughts
There you have it, all the different ways to use authentication with a server-sent events endpoint, which can be combined with the previous article about user targeting.
tags: server-sent-events - sse - authentication - short-lived-tokens - cookies - aspnetcore - dotnet - blazor - cors - security - httpclient